
I fitted a Cane Creek headset when the Mojo was new and it has been great. Until now.

I fitted a Cane Creek headset when the Mojo was new and it has been great. Until now.
All suspension bikes seem to be more vocal than hardtails irrespective of bushes or bearings. Carbon frames tend to highlight this by amplifying the sound of any small thing sufficiently that everyone around me complains.
I have been trying a range of different bearings to find something Stanmerproof.
Bearings have a code that determines size and shielding etc. but quality is a little more difficult to measure. Most bearings use caged balls but some are double row which means tiny ball bearings. These need good seals to repel the mud. I examined several different types of bearings before fitting and found the grease quantity varied, the seal edge gap was different and the smoothness of the bearing when turned in your fingers even changed between manufacturers.
I fitted the metal shielded bearings first and ran them for a while. The seal was much better than I expected and there was no impact damage from jammed mud or stones on the outside. The main fault was wear even with a full grease quantity. Any water penetration killed them quite quickly though. I ran two sets to find an average and give a B.
I tried the rubber shield bearings next which are more common (but the same price). I expected the seal to be better and some physical damage but found the seals to be poorer and lifetime was reduced. Photo shows the condition with the seal removed. As the seals were poorer these get C.
I have had three different suspension bikes and all of them need servicing before you think necessary to keep them running smoothly. I strip and clean the bike frequently including removing the fork and removing links and triangles and this forces me to check the bearings. You can check yours by removing the air from the shock, perhaps the shock itself and move the rear end with the wheel removed. If it is not super smooth it needs fixing.
Some older bikes need specialist tools, some newer ones supply links with bearings fitted which is a quicker change. Changing bearings is usually a mid range technical job on a bike to allow for using a drift and a bearing press or vice. Damage is easy if your hammer is near the top of your tool box.
As nothing is Stanmerproof yet I am now running some more expensive bearings (SKF) and my bike is now quieter and even surprised a badger last week by sneaking up behind him without an alarming squeak. I will update this report as soon as it begins to squeak again but hoping to give them an A this time.
 I have been trying different brake pads over the last few weeks as I bought some ceramic pads (Brake Authority) just to try. I fitted ceramic to the rear and left original sintered on the front. I did try and bed the pads correctly by entertaining the small children in the street by riding up and down braking repeatedly and feeling a little foolish.
On riding the rear brake was great. Late braking with a slew was easy and the additional ‘bite’ was useful when misjudging a corner. Changing ceramic to the front was more difficult and threw me over the bars first time. Braking was improved but tyre adhesion became critical and I had to change tyres to feel safe. I had to brake harder on the rear to balance with the ceramics and that caused the brakes to wear quickly, about twice as fast as usual.
I have now tried new sintered pads on the rear to estimate wear but I like the ceramic pads. Rotor wear looks minimal, wet squeal is about the same, pad wear seems excellent, initial bite is not too severe and modulation within reasonable expectations but that may be my brakes too.
 Photos show difference in wear and if your pads look like the first you are changing them a little late as my braking had disappeared by this stage.
So apologies if you have been riding behind me and I have using just the front brake or just the rear or sliding uncontrollably on every corner however the answer may be to buy new pads and ceramic may be worth a little extra.
The snow and mud of winter always takes a toll on a bike so the change of clocks should be seen as a prompt to cle an your bike. As Easter has now been and gone you need to do your spring clean before it becomes a summer clean.
A full strip down makes this much easier so I clamped it in my bike stand and started taking off bits. If you are going to do the same then make sure you have all the spare bits needed before you take the old bits off. Small items like cable patches, gear cable ends, zip ties even, need to be replaced. I left some stuff grouped together to save a little time and removed the handlebars with the brakes and shifters still attached. This meant removing brake calipers and all the inner and outer cables but it leaves the frame clean. Wheels off, split the chain and remove the pedals, cranks and bottom bracket took only a few minutes.
This would have been enough but I also removed the fork,shock, rear mech and the suspension links allowing me to split the frame as well.
Protective tape does a great job of protecting the frame but it discolours around the edges where the mud is forced in so I removed all the tape, removed the residue and finally removed the cleaning agent.
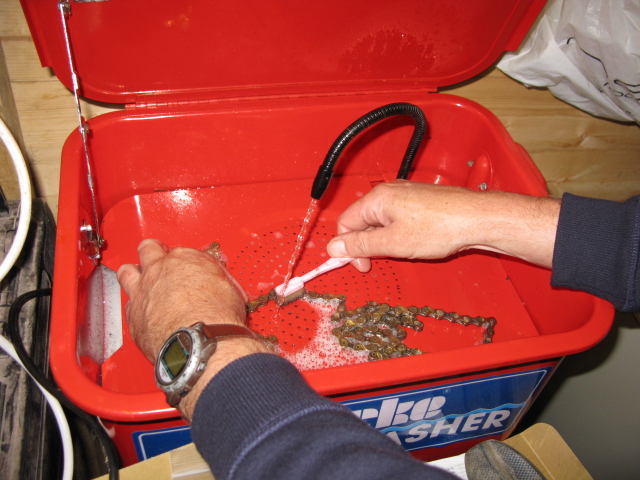
I washed everything using a small electric parts washer, several trays for various rinsing and most well known brands of cleaners but only those with an orange citrus label.
My ibis came with some touch up paint which was applied where the odd flint had been fired through the tape. I am always surprised at the thickness of the carbon around the bottom bracket but I think a bash guard is a must.
New tape is a fiddle but worth the time to make it neat, the suspension links checked and seemed fine but I will change these again shortly. I found on my previous Nomad new bearings never seemed necessary but always made a huge difference so I will continue the practice. I did remove the seals and add a little grease in places.
All the other bits were checked and cleaned before re-assembly but close inspection finds lots of tiny things. I re-used the pads and cables but they both need more checking when the trails run brisker. The front mech HL stops were reset and the alignment checked several times. The chainset gap is often overlooked but this can be the cause of chain ache. This normally happens in the rain at night though. Brakes back on, seatpost cleaned and Michael Bubled as you need special Bubles in a carbon frame grease to stop it creaking and crooning.
You could rush through a good clean in a couple of hours including a little dismantling or you could allocate a sunny afternoon and do some of the little jobs that get missed. Clean and grease the quick release on your wheels or your seatpost clamp perhaps grease the screws on the cleats of your shoes rather than wait and drill them off.
Overall without servicing any major parts like the forks the whole bike feels better and runs quieter. The source of one creak turned out to be the freewheel which just needed a strip and clean to run silent once more.
The only negative comment was that the removal of my motocross mudguards made it seem less orange so one more job to do.
How many tools are too many?
Sockets, spanners, screwdrivers, pliers and hex keys are all standard fare for the fettlers amongst us. Some mountain bikers will also use the occasional hammer, but only very carefully of course, and all of us need the one specialist tool that we do not have or has just broken.
Changing a bottom bracket, old or new, requires at least two specialist tools, removing a cassette needs a special socket and a chain whip and hubs and linkages may involve a combination of tools as well as three hands.
Some tools make life easier and these include tiny grease guns that deliver a mini amount of grease in exactly the right place and a little bit more just on your trousers. The most useful tool is undoubtedly a hose but these do not work at all unless you have special brushes shaped like witches hands.
You will need a proper toolbox after a while so you are forced to go to Halfords and compare the feel of drawers fitted with roller bearings with the expert air of a wine taster. You then immediately need to buy more tools to fill it that are all more expensive including different sizes of torque wrenches, a tap and die set, tiny screwdrivers, some needle files, some ratchet spanners and more specialist tools. You have room for a brake bleeding kit and at least one tool needing a battery. This should really be a digital vernier for a tenner but that does not make a noise so a Dremel at eighty is obviously better value. You might not be sure why you need this but polishing tiny bits until they shine is almost an art form. A small lithium ion screwdriver can take off brake discs in a jiffy and is only fifty quid. Hundreds of pounds disappear in less than half an afternoon.
Something that is really useful is a bike-stand but do not skimp on this as a cheap one can be more of a problem than a help. If you have a shed or a garage then you have room for big toys; racks and shelves, a vice, a proper workbench and maybe a few things to impress the visitor.
You can true a wheel in a vice with a pencil but a dedicated unit bolted to the bench shouts expert. A digital scale hung from a hook implies a hidden advantage and a table top jewellers scale betrays a secret vice.
You do not need an air compressor even though inflating tyres would be easy, drying off bearings a breeze, your chain could be cleaned, dried and re-lubed with certainty and you could even justify an air tool. This would make a special noise. But you do not need this. Alec has a compressor but I am not envious. At all.
Instead I spent the money on a parts washer and it is cheaper and smaller to store. It was less than forty quid and is essentially a pump and a filter. Items are cleaned under a stream of cleaning fluid which works well but not like magic. Water based rather than the solvent of old it should be safe for everything on your bike but dismantled assemblies clean easier. Other costs are a tub of expensive liquid cleaner, but it lasts for months, and a few pennies a day in electricity. Maintenance is low but it needs the filtered bits cleaned out and occasional emptying as if left unused mould grows in great clumps.
Overall it works quite well but you could easily make do with a bowl and some elbow grease so it is not recommended as an essential item but it is a nice extra. It does help with chains and cassettes but they need careful rinsing and drying before re-use so it would work better with a compressor alongside.
So add it to your list for a full bike shed outfit but buy the compressor first.

There are several bike tool sets available now and most of them are quite expensive This one form Lidl is cheap and may contain some tools that are not commonly used but could be ideal for a weekend away in Wales where something will break.
The quality of the tools is much better than I expected with the chain tool straight and strong and coped easily with chain duties. Cassette tool has been used for a few off and on’s with no slips or major wear. This comes with a spanner/lever which is much better than a large spanner and using the quick release or even a ratchet set when I drop the cassette tool onto the floor under the toolbox every time.
Some bits, e.g. puncture outfit, screwdriver, small spanner, are a bit cheap and cheerful and not workshop quality but for emergency use seem fine.
Chain whip does not flex and the cone spanners have an accurate mouth but 17mm is missing so XT rear hub needs another size.
There a couple of other items that will appeal to the old roadie within you but some items have a modern application with one being used last night on a Chris King hub instead of the bespoke tool.
Overall worth buying if they have any left in a store near you and marks out of ten – nine. Now if they had been orange….

There are good instructions for different hubs, e.g. Hope, on the relevant manufacturers sites but for older designs then a mtb maintenance book (Steve Worland) or a magazine spread (Mountain Bike Rider) may be sufficent. Continue reading
This is a quick service job on a 20mm DMR Revolver through hub. The bearings are sealed so replacement is required when you hub starts to sing to you on a quick downhill section.
Do not assume that your local bike shop will hold stock but the manufacturer’s site will normally state the size and some show simple instructions for changing the bearings. The main internet suppliers will reply to a query about size and even offer you a part code.
If you are really keen then there are some sites which delve into bearing nomenclature and the delights of hoop stress and radial stress. Please allow me to bore you with this individually on a ride.
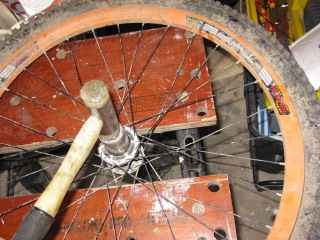
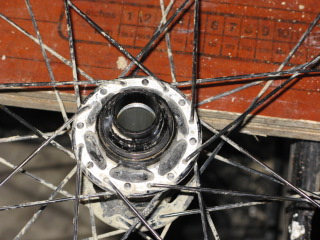 Hub showing the outer cup but with through axle removed
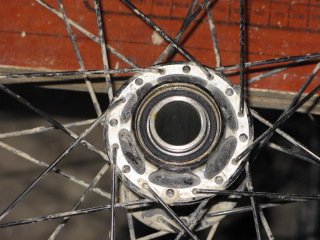 bearing in hub
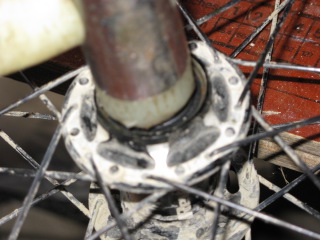 gently tap out inner axle and bearing on lower side
 carefully tap out second bearing
 tap in new bearings and axle using correct sized socket to prevent damage
 pressing bearings fully home
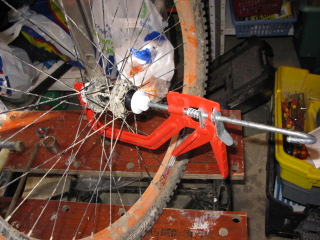
I fitted the external cups and gently pressed the bearings fully home. The manufacturers instructions suggested using the socket and hammer method but this seemed harsh. I did consider using a drill press or a vice but the correct tool is a bearing press. I used this ratchet clamp as a substitute.
Everything was cleaned and regreased at the appropriate points.
A quick service job that is less difficult than cup and cone as all the worn bits get replaced as a unit.
Spring was sprung in a flurry of snow and rain, summer seems to have arrived immediately, and all the maintenance jobs that have built up over the winter need to be completed before long summer days begin to shorten.
Some bikes may need virtual rebuilding of the transmission, forks, brakes, wheels and perhaps all the bearings and bushes in that clever linkage. Got a singlespeed, rigid forked hardtail and feeling smug? You still have a headset, bottom bracket, cables, and brakes. Obviously both hubs need servicing, wheels that need to be trued and maybe that maintenance free frame needs all the protective tape and patches replaced.
Forks seem to last almost forever nowadays until they fail and you fall off into a bomb hole at Pitch Hill. Some forks are less straightforward than others are when it comes to servicing and 36 Vanillas seems to need more than most. After checking component prices and even a tool or two perhaps consider a specialist like Mojo or TFShox. My Vanillas came back from Mojo with new lower legs, fully serviced and all for £100. So think about whether the service cost is reasonable especially considering the benefit of the warranty guarantee.
Rear shocks can seem perfect but when did you last even check the air pressure or the sag. Many shocks are an easy lubrication task with various guides in the bike magazines or online.
Brakes have improved dramatically over the last few years with all the latest models offering great stopping power and almost forget it reliability. However, mud, grit, rain, and damp storage are the perfect combination to encourage corrosion in even the most resistant alloys. Try removing your pads and pushing the pistons in your brake callipers fully home. You might have to allow some fluid release from the reservoir but also allows you to check carefully for signs of corrosion due to even the smallest of leaks and like your car they need re-bled occasionally or even the whole fluid changed. If you are lucky, you might just need to remove the pads and clean the springs before refitting. If it needs a little more then perhaps your local bike shop would appreciate the work.
Bottom brackets are easy to remove and now do not need complete rebuilding down to the smallest parts after a wet ride or two but a strip and re-grease will delay the time until replacement is required.
Headsets tend to work uncomplainingly but even the best units appreciate a wipe and some new grease. Cheaper models would be delighted with some new bearings too.
Transmissions are complex mechanisms that we want to be light, stiff, and smooth as silk when changing gear up a hill, in the mud under load. That chain that has had a bit of a clean and oil over the winter needs a close check for twisted links and for wear in its length. Use a chain gauge or a ruler to check the length for wear. Cassettes wear too so squint at all the rings. If the teeth look hooked then it needs replacement. While working at the rear hub take off the freehub and service it too. Replacement bearings and even axles are available and save loads of effort turning a worn hub up a hill.
Cables seem to look perfect even at the end of their life so if you want to check them cut off the cable end and pull them out of all the cable outers. If it is not almost perfect, new cables are cheap and easy to replace and it forces you to reset the indexing.
Front hubs require a clean and re-grease and bearings replaced occasionally.
Other parts seem maintenance free but check saddle rails for straightness and maybe a proper clean underneath and on top.
The seat post needs the clamp and bolt cleaned and regreased and the post itself checked for cracks.
 Rim Tape
I remember the cloth tape with metal closures on the bikes of my childhood when drop handlebars and five gears were uber-cool, or groovy as no one used to say. Continue reading
